© Cascadeur
Cascadeur, a contributor to the SIGGRAPH 2019 Studio, is a physics-based animation software for creating physically accurate animations for games and movies, recently introduced by the Russian mobile game developer Banzai Games and its publisher Nekki.
In Cascadeur, developers can create realistic animations of characters of almost any type — humans, animals or any other creatures — without the need to use motion capture technology.
For decades, when creating animations for games, developers had to decide between two production methods: motion capture (MoCap), with 100% realistic motion data, or manual animation (by hand). Both methods have advantages and disadvantages in terms of time, cost, and realism of the results. Although it can be very expressive, handdrawn animation will never look realistic. MoCap looks realistic but has a lot of physical limitations and depends on the skills of the human actors.
Cascadeur introduces a third way of animating, eliminating some of the drawbacks of the other two methods. Cascadeur’s main purpose is to provide animators with convenient tools, allowing them to a) create realistic, believable action animation from scratch and fix the physical characteristics of the animation with the help of physics tools, or b) take existing MoCap data, modify it to the desired result, and fix the correctness of the physical characteristics.
At SIGGRAPH 2019, Banzai Games introduced the closed beta version of Cascadeur in a lecture and a 90-minute workshop. The feature that received the most attention was the alpha version of a deep-learning based AutoPosing tool, which the developers presented with a YouTube video, just in time for SIGGRAPH:
Due to interest in the tool, we asked Banzai Games to tell us more about the development of its AutoPosing feature. In the following article, Cascadeur Chief Producer Evgeniy Dyabin and his team describe how they approached the development of the AutoPosing tool as well as offer a short tutorial that describes how to use it.
Section 1: How We Developed AutoPosing
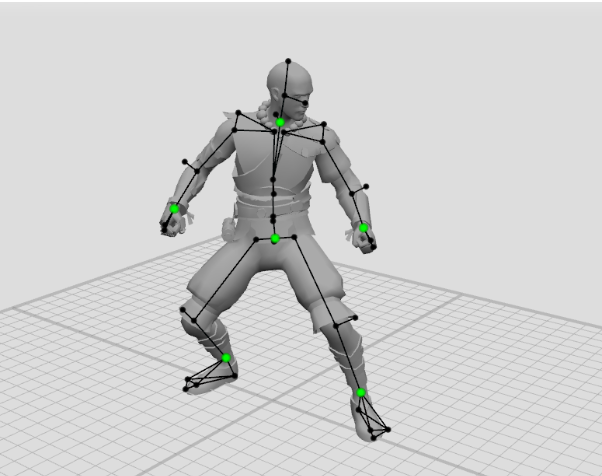
While working on our mobile game “Shadow Fight 3,” we accumulated a lot of combat animations — about 1,100 movements with an average duration of about four seconds each. Right from the start, we knew that this would be a good data set for training some kind of neural network. During our work on various projects, we noticed that animators can imagine a character’s pose by drawing a simple stick figure when making their first sketches. Since an experienced animator can set a pose by using a simple sketch, we thought it would be possible for a neural network to handle that, too.
From there, we decided to take six key points from each pose (wrists, ankles, pelvis, and base of the neck) and check if the neural network can predict the position of the remaining 37 points.
The procedure of the learning process was clear from the beginning: At the start, the network would receive the positions of six points from a specific pose and would have to output a prediction of the positions of the remaining 37 points.
We would then compare the output with the positions in the original pose. In the loss function, we would use the “least squares” method to calculate the distances between the predicted positions of the points and the source.
For the training dataset, we had all the movements of the characters from “Shadow Fight 3.” We took poses from each frame and got about 115,000 poses. But, this set was quite specific — the character almost always looked along the X-axis, and his left leg always was in front at the beginning of the movement.
To solve this problem, we artificially expanded the dataset by generating mirror poses and randomly rotating each pose in space. This allowed us to increase the dataset to 2 million poses. We used 95% of the poses for network training and 5% for parameter setting and testing.
The neural network architecture we chose was fairly simple — a fully connected, five-layer network with an activation function and an initialization method from Self-Normalizing Neural Networks (SNNs). On the last layer, activation was not used.
Having three coordinates for each node, we got an input layer of 6 x 3 elements and an output layer of 37 x 3 elements. We searched for the optimal architecture for hidden layers and settled on a five-layer architecture with the number of neurons of 300, 400, 300, 200 on each hidden layer, but networks with fewer hidden layers also produced good results.
L2 regularization of network parameters also was very useful. It made predictions more smooth and continuous. A neural network with these parameters predicts the position of points with an average error of 3.5 centimeters. This is a very high average, but it’s important to take into account the specifics of the job. For one set of input values, there may be many possible output values. So the neural network eventually learned to issue the most probable, averaged predictions.
However, when the number of input points increased to 16, the error average decreased by half which, in practice, yielded a very accurate prediction of the pose.
At the same time, the neural network could not give out a completely correct pose while preserving the lengths of all bones and joints connections. Additionally, we launched an optimization process that aligned all the solid bodies and joints of our physical model.
You can see the results of this work in our video. The results are quite specific, because the training dataset is made of combat animations from a fighting game with weapons. For example, a character is posed in a fighting stance and turns his feet and head accordingly. Also, when you stretch out his hand, the wrist is turned as if he’s holding a sword.
This led us to the idea of training a few more networks with an expanded set of points that specify the orientation of the hands, feet, and head, as well as the position of the knees and elbows. We have added 16-point and 28-point schemes. It turned out that the results of these networks can be combined so that the user can set positions to an arbitrary set of points.
For example, the user decided to move the left elbow but did not touch the right one. In this case, the positions of the right elbow and right shoulder are predicted in a six-point pattern, while the position of the left shoulder is predicted in a 16-point pattern.
Our team believes that this can turn out to be a really promising tool for working with a character’s pose. Its potential has not yet been fully realized, but we have ideas on how to improve and apply it for more tasks.
Note: The alpha version of this tool is already included in Cascadeur. If you want to try out the AutoPosing feature on your own, please sign up for the closed beta test on cascadeur.com. After registering for the closed beta, you will get a download link within a few days.
Section 2: Cascadeur AutoPosing Tool in Use
Preparation
Each of the following steps assume that you have downloaded and installed the beta version of Cascadeur. We suggest familiarizing yourself with the basic functions of the software through the help of the video tutorials before beginning.
Let’s start. The AutoPosing tool has its own controllers in the form of large and small green points. To enable them, click the “Enable AutoPosing Tool”button. You can switch to view mode so that the other point controllers do not interfere with AutoPosing. You can also turn off textures displayed in the “Visible” tab.
Large green points are the main active controllers. Small green points will adapt to the position of the active controllers. For example, if you select a large green point of the hand and pull it, the character’s shoulders and torso will automatically turn after the hand, preserving the natural position of the body.
It is enough to set the position of only six large points to get close to the desired position. If this is not enough, you can use additional points.
Adding Active Controllers
If you grab and move a small green point, it will also become an active controller. In this case, the point turns blue and begins to affect small green dots. Also, it will no longer adapt to the position of large green controllers. If you make all the dark green points blue, then the control will be almost the same as with ordinary point controllers.
To disable active mode for a small point, select it and press Shift + Z. After that, it will turn dark green again, and its position will depend on the active points.
Locking Controllers
Blue dots do not adjust to the position of other active points, but they still follow the laws of physics. If you strongly pull the character by the hand, even the active points will begin to shift with the body. To lock a point in a certain position in space, you must select it and press Shift + R. Pressing it again will release the lock.
Selecting and Moving Controllers
You can select all the active point controllers with a frame in AutoPosing mode. A double click on a point will select all the controllers below the hierarchy. After rotating or moving a group of controllers, all inactive controllers become active and turn blue.
For example, rotating the palm can control the position of the elbow. A double click on the wrist will select all three wrist controllers, and, when rotated, two controllers will become active and turn blue.
You can set poses pretty quickly by moving large controllers first and then refining the pose by adding new controllers and locking them.
To disable AutoPosing controllers, click the “Hide AutoPosing Tool” button.
This piece was contributed by Tom Borovskis (Nekki, Team Cascadeur) as a follow up to the SIGGRAPH 2019 Studio workshop, “Physics-Based Character Animation With Cascadeur.” Do you have an installation or hands-on class for SIGGRAPH attendees to experience? Share your cutting-edge content in SIGGRAPH Labs, formerly Studio, at SIGGRAPH 2020.